
-Farcry Level -
Tools:

Duration:
4 months
Team Size:
1 (solo)

First-Person Shooter
Mission
Action
Farcry 5 Editor
Project Description:
A 10-minute experience of a level made in Farcry 5's level editor. Utilizing level design principles of lighting, vertical spacing, and visual storytelling to portray a hiker's mission for revenge.
My Role:
Using Farcry 5's editor, I went through a process to create a 10-15 minute level of medium difficulty. Using grey boxing, playtesting, and an LDD to refine the level for an engaging player experience.
Level Design Document
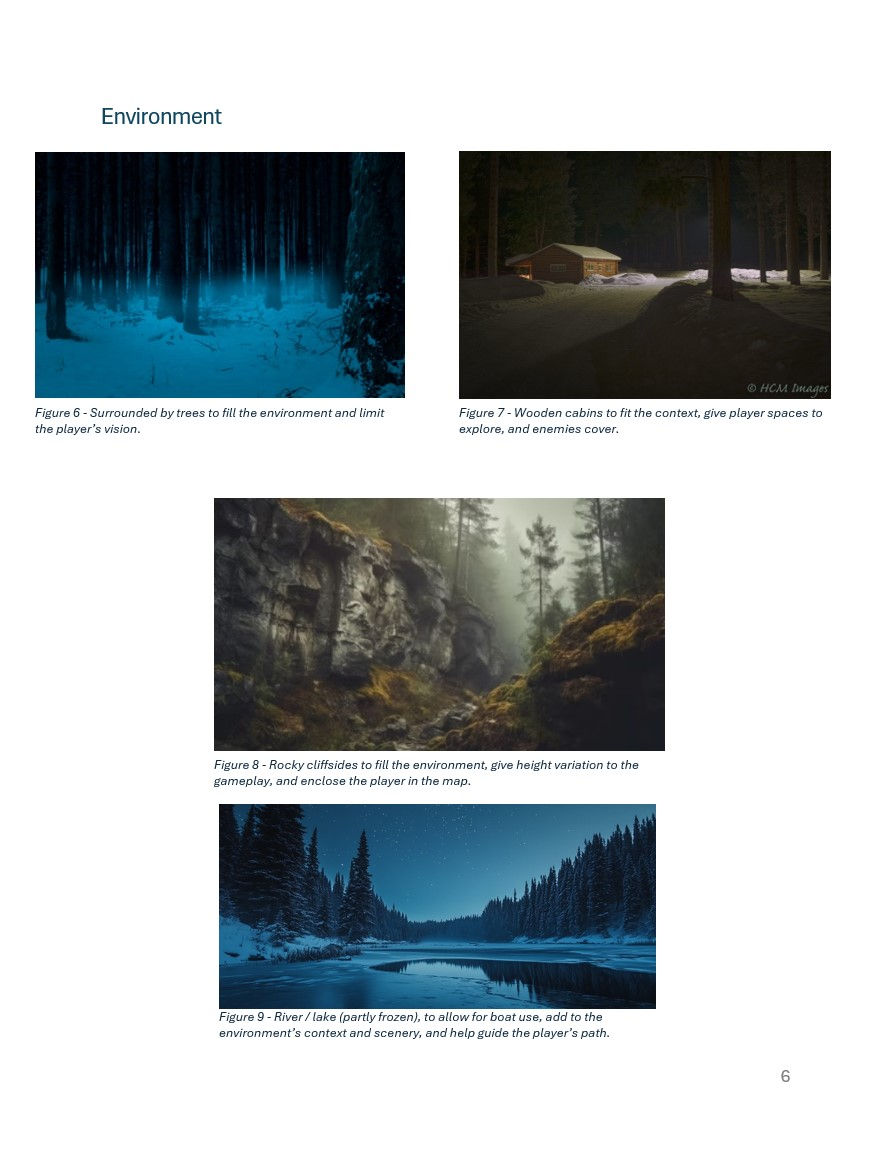
To begin creating the layout and context of this level, I started by creating an LDD. This gave me space to document reference images for any ideas, draft diagrams of how I would space the level, and various details about the gameplay. After defining some key decisions for the level, I was able to go into the editor with a plan and focus my attention on physically creating it. I would then update any changes to this document as the level evolved to keep my plan consistent throughout the project development.
Click icon to open PDF
| Level Design Document |

Click Image to Enlarge
Click Image to Enlarge

Click Image to Enlarge
Click Image to Enlarge
Level Design Document - References


Left - Approach / Danger Zone Diagram
Right - Map of Level / Gameplay Beats
Level Strucutre / Teaching
This was my first time using the Farcry arcade though I was able to quickly pick up its controls and interface to begin grey boxing and sculpting my level. With the majority of the level being within an outdoor environment, I began with sculpting the terrain and painting vegetation to quickly form the spacing and paths the player would take.
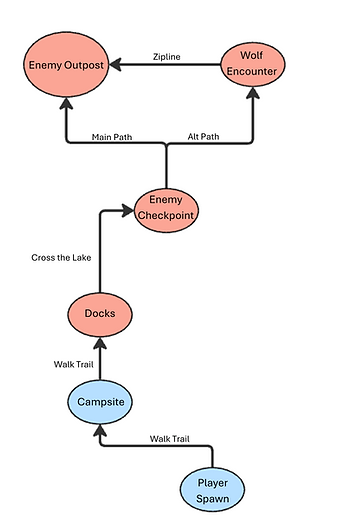
Gameplay Beat Overview & Level Boarders

1. Lake View
2. Campsite
3. Docks
4. Enemy Checkpoint
5. Outpost
From here, I used the editor grey box assets to create the various structures that would make up the enemy building and outpost. This brought me closer to creating the player and enemy's intended interactions as the level progressed.

Mechanic Progression Chart
Once the foundation of the level was complete, I began adding the gameplay elements and enemy AI to challenge the players and give them compelling interactions. I did this intending to progressively teach the player new mechanics and scale the difficulty to build a climax for the end of the level.
Playtesting & Iteration
Playtesting this level was very helpful when it came to refining the players' understanding of the level paths and enemy interactions. The environment of this level was very open being outdoors so observing if the players would follow the intended path quickly showed me what areas needed to be refined. For enemy interactions, observing the difficulty players were facing and how it progressed through their playthrough highlighted where things needed to be balanced. This stage in the development was crucial in refining the experience to be intuitive and accurately challenging for the general player. Here are a few examples of changes made regarding tester feedback:
Change #1:

Before

After
Why: Observed some playtesters getting lost and not taking the intended path. To solve this I added props to help naturally guide the player to the next gameplay beat.
Change #2:

Before

After
Why: Observed that some playtesters were unsure of where to go and received feedback regarding their confusion. To address this, I enhanced the existing signifiers to be more noticeable.
Change #3:

Before

After
Why: Observed some playtesters were not aware of certain enemy encounters which resulted in frustration. To solve this, I used lighting to draw players' attention to these encounters (often enemies on rooftops / above player's eyeliner)
Personal Takeaways
-
Gained confidence in my ability to use my knowledge of level design to create a complete experience.
-
Improved my ability to use visual storytelling through level design while still prioritizing gameplay.
-
Gained confidence in working within an engine that I was previously unfamiliar with.